Spinstack lets you describe an AI agent in plain English and turn it into a long-horizon workflow — with a REST API, an evaluation harness, operator surfaces, and end-to-end observability — without writing a line of code. This guide walks through each step from blank page to a running, evaluated agent.
Before you begin: Credits
Building and testing an agent consumes credits. Free accounts have 50 credits per month. Pro accounts ($25/month) receive 150 credits per month and are never hard-blocked — usage above the monthly cap is billed as overage rather than stopping your session. Credit consumption varies based on the complexity of your agent and how much optimization it requires. You can monitor your balance in the top bar of Agent Studio at any time, and earn bonus credits by sharing your agents on social media.
Step 1 — Describe your agent
Navigate to Agent Studio from the sidebar or dashboard. You will land on a screen titled "Create an agentic flow".
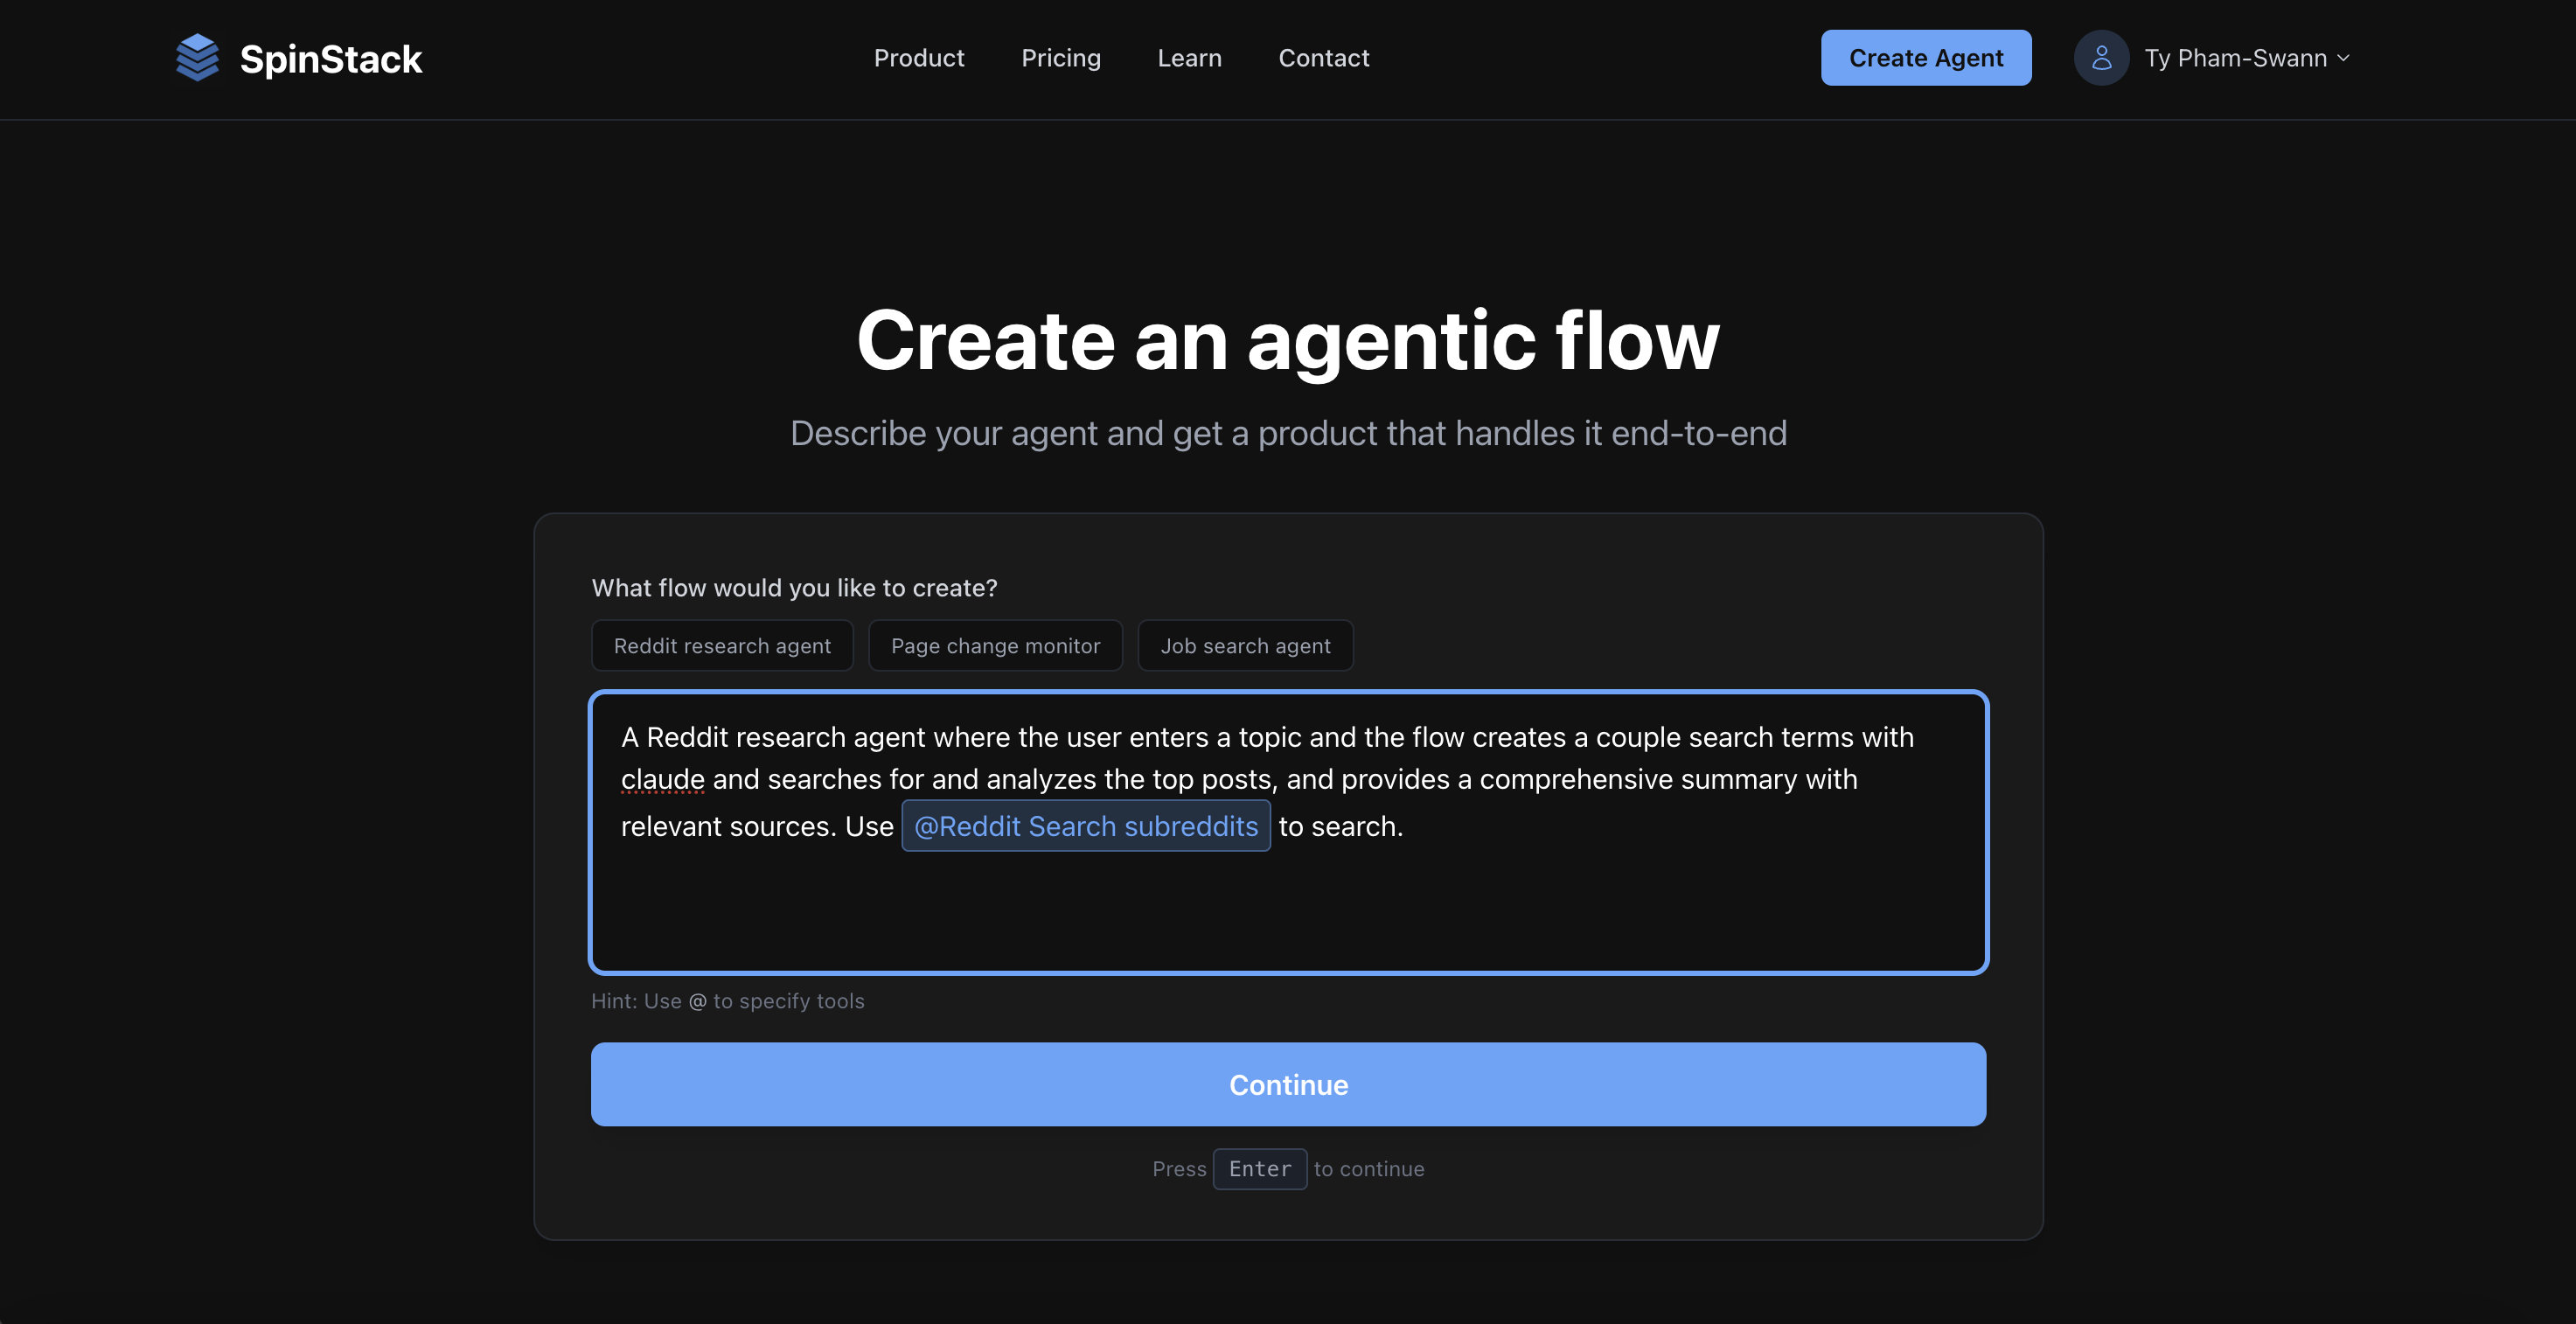
The single input is a free-form description of what you want your agent to do. Be as specific as you like — describe the inputs the user should provide, what the agent should do with them, what the output should look like, and any tools or services it should connect to.
Example descriptions:
- "A Reddit research agent where the user enters a topic, the agent creates search terms with Claude, searches for top posts, analyzes them, and returns a comprehensive summary with sources."
- "An agent that takes a website URL, scrapes the page, and checks if it has changed. If it has, generate an llms.txt and send a Slack message. If not, send a message saying the page is unchanged."
- "An agent where a user describes their job search criteria, it finds new matching listings, checks which ones were already found in previous runs, and emails only the new ones via Gmail."
You can also use @mentions to pin specific tools into your agent. Type @ anywhere in your description and a tool picker will appear. This is useful when you know exactly which integration you want — for example, @Gmail Send Email or @Slack Send Message. Pinned tools are guaranteed to be included in your agent.
When your description is ready, click Continue or press Enter.
Step 2 — Configure your product
After clicking Continue, a configuration modal appears immediately.
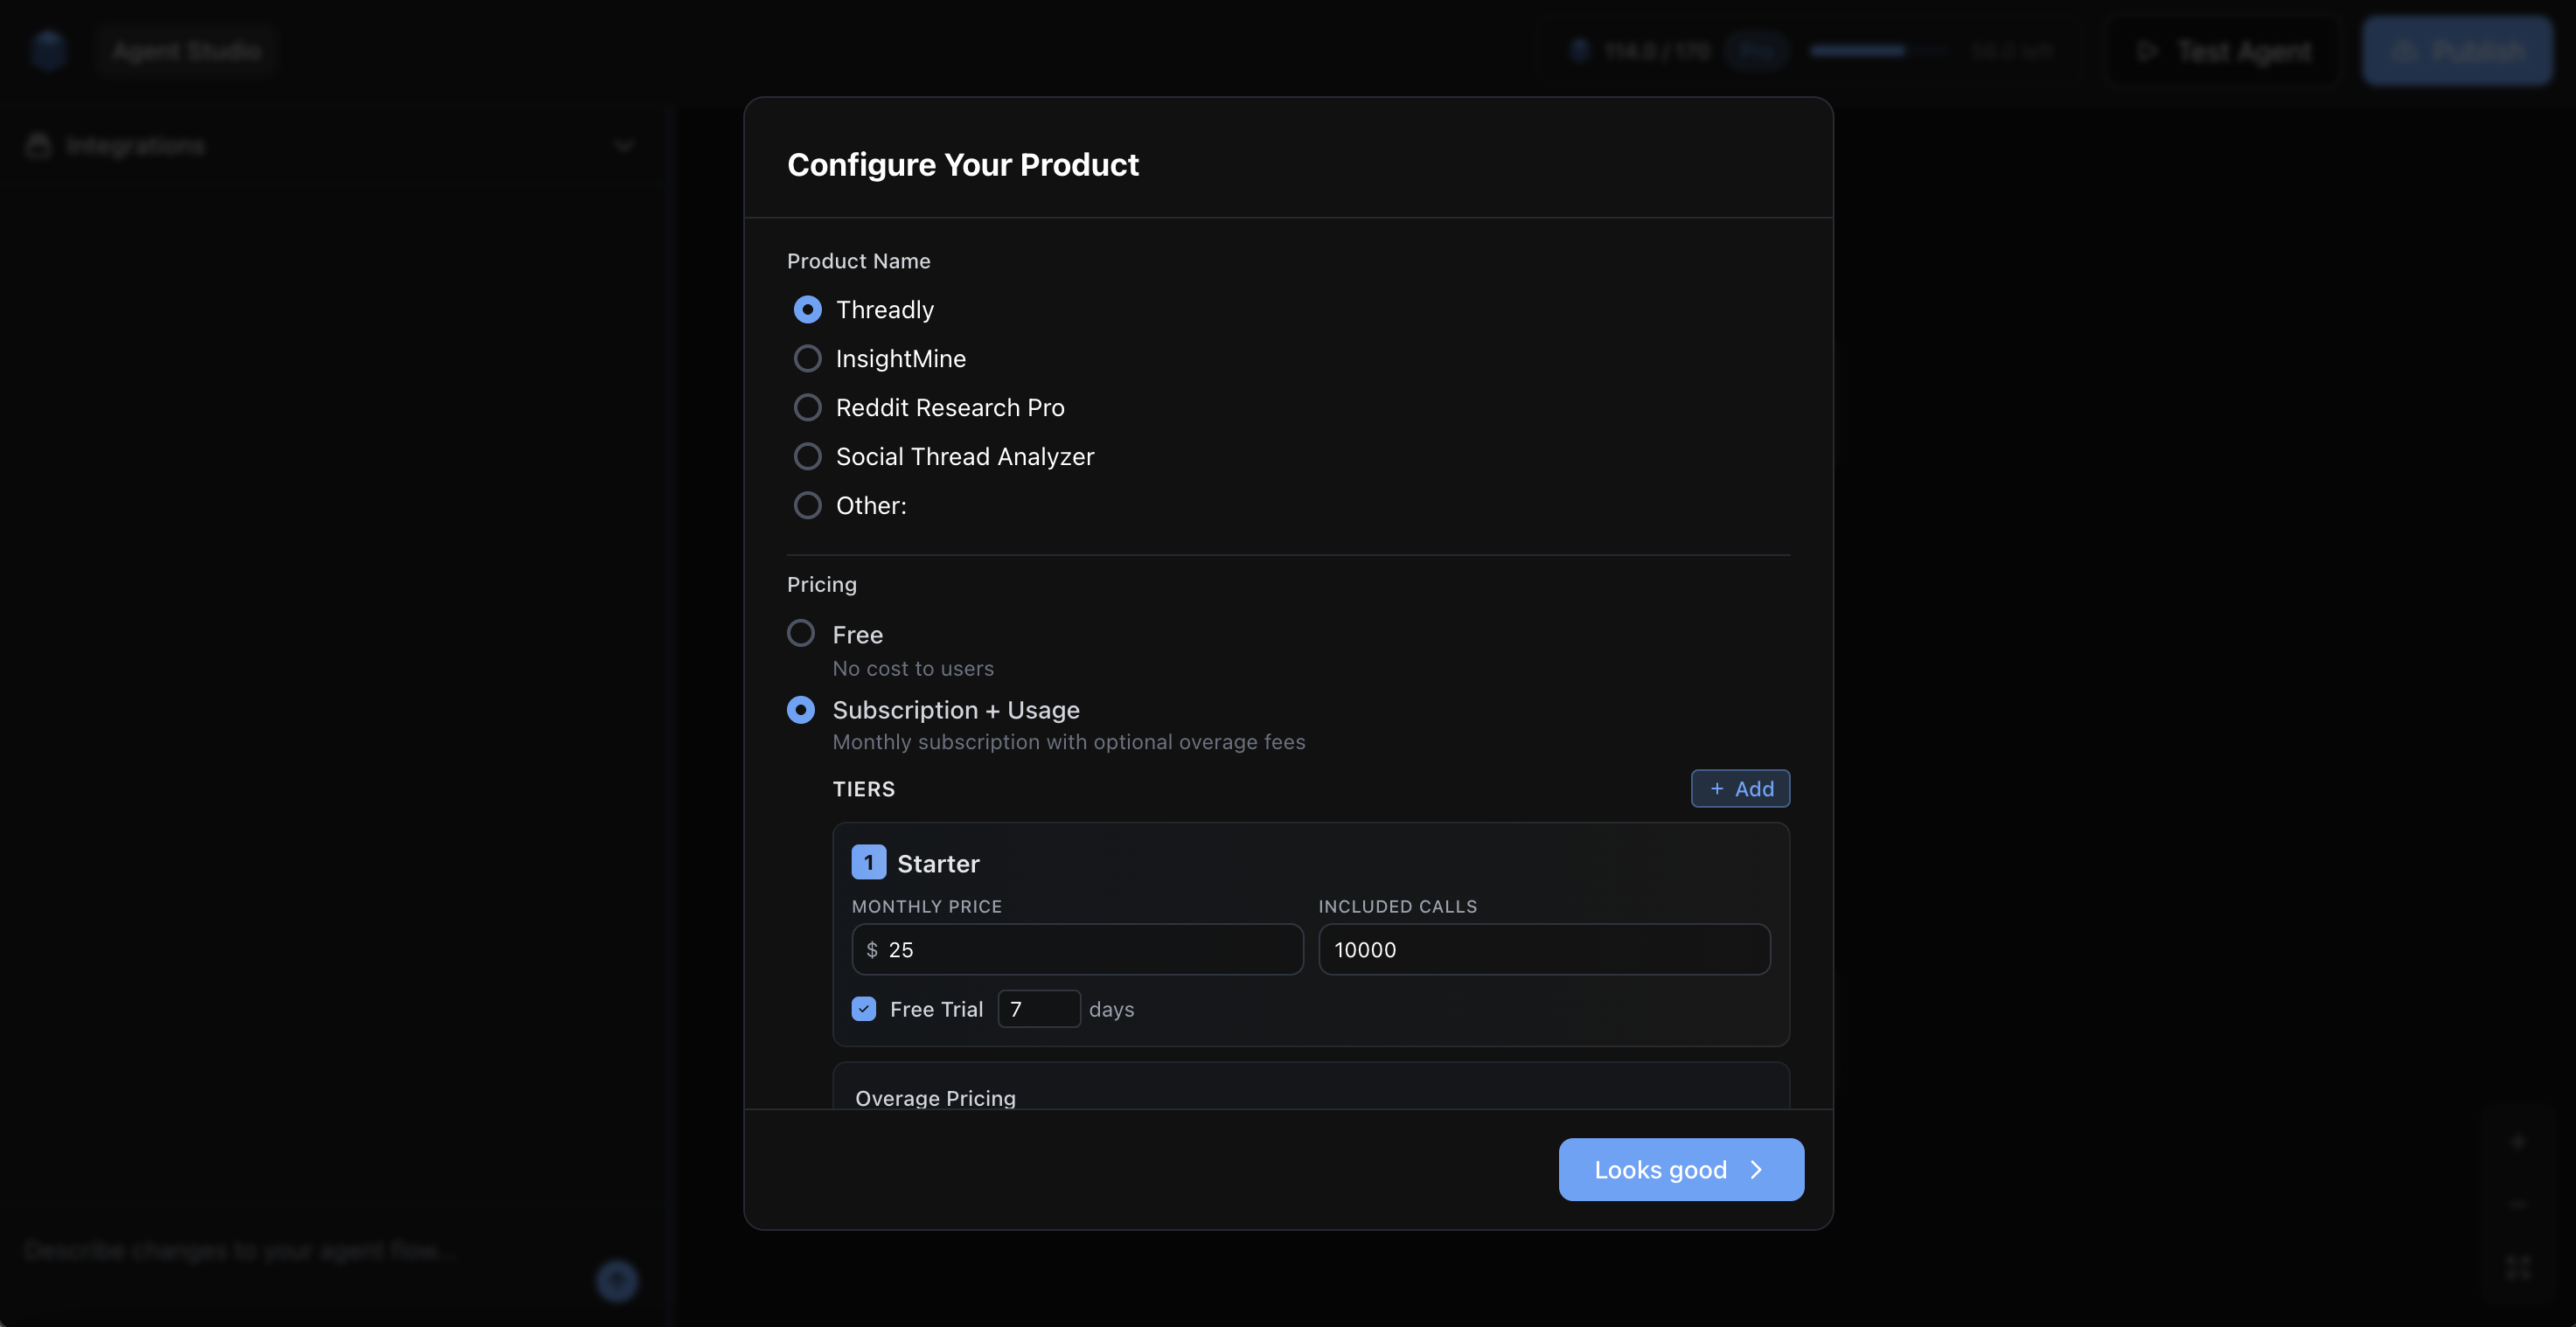
Product name
The system generates a few name suggestions based on your description. Select one or choose Other to type your own. The name becomes the public-facing title of your agent's generated pages and appears on your manage page.
Pricing model
Choose how your end-users will pay to use your agent:
- Free — Your agent is free to use. No payment setup required. Good for internal tools, demos, or open-access utilities.
- Subscription — Users pay a recurring monthly fee. You define one or more tiers (e.g. Basic at $9/month, Pro at $29/month), each with a usage credit allowance. Users who exceed their allowance in a billing cycle can be charged overage.
- Usage-based — Users pay per call with no subscription. You set a price per unit and users are billed based on actual consumption.
You can change pricing after launch from the Manage Agent page.
Theme
Pick a visual theme for your agent's generated pages. The theme controls the color palette and styling of your home page and app page. You can change this later, and the pages themselves are AI-editable from the Manage Agent page.
Once you are satisfied, click Looks good. Spinstack will build and assemble your agent onto the canvas.
Step 3 — Watch your agent assemble
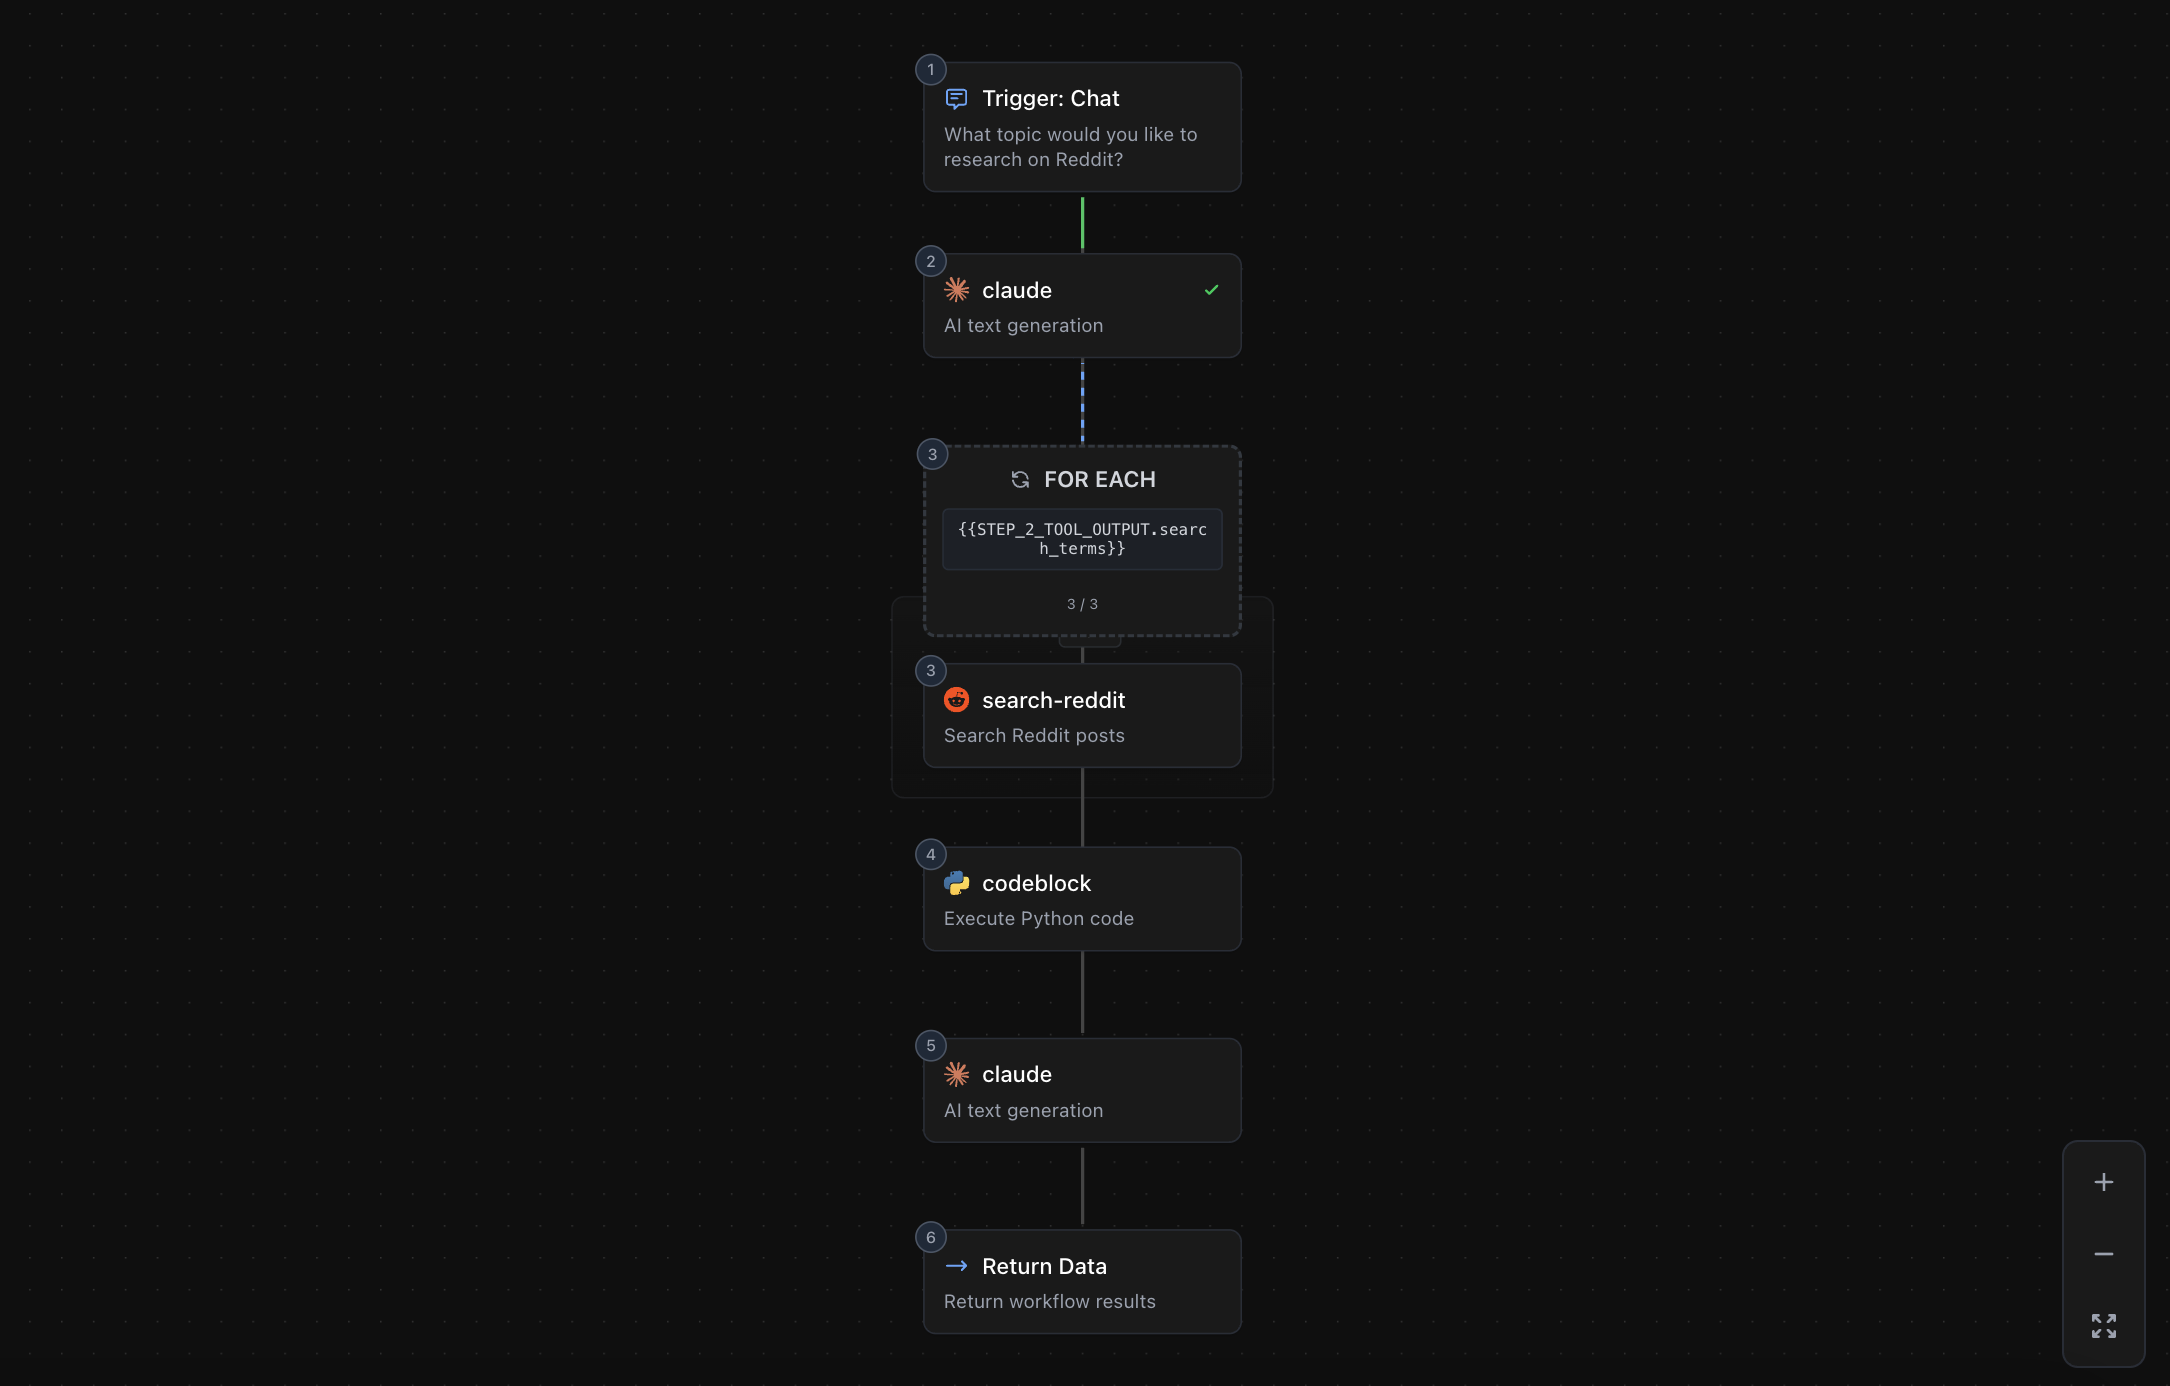
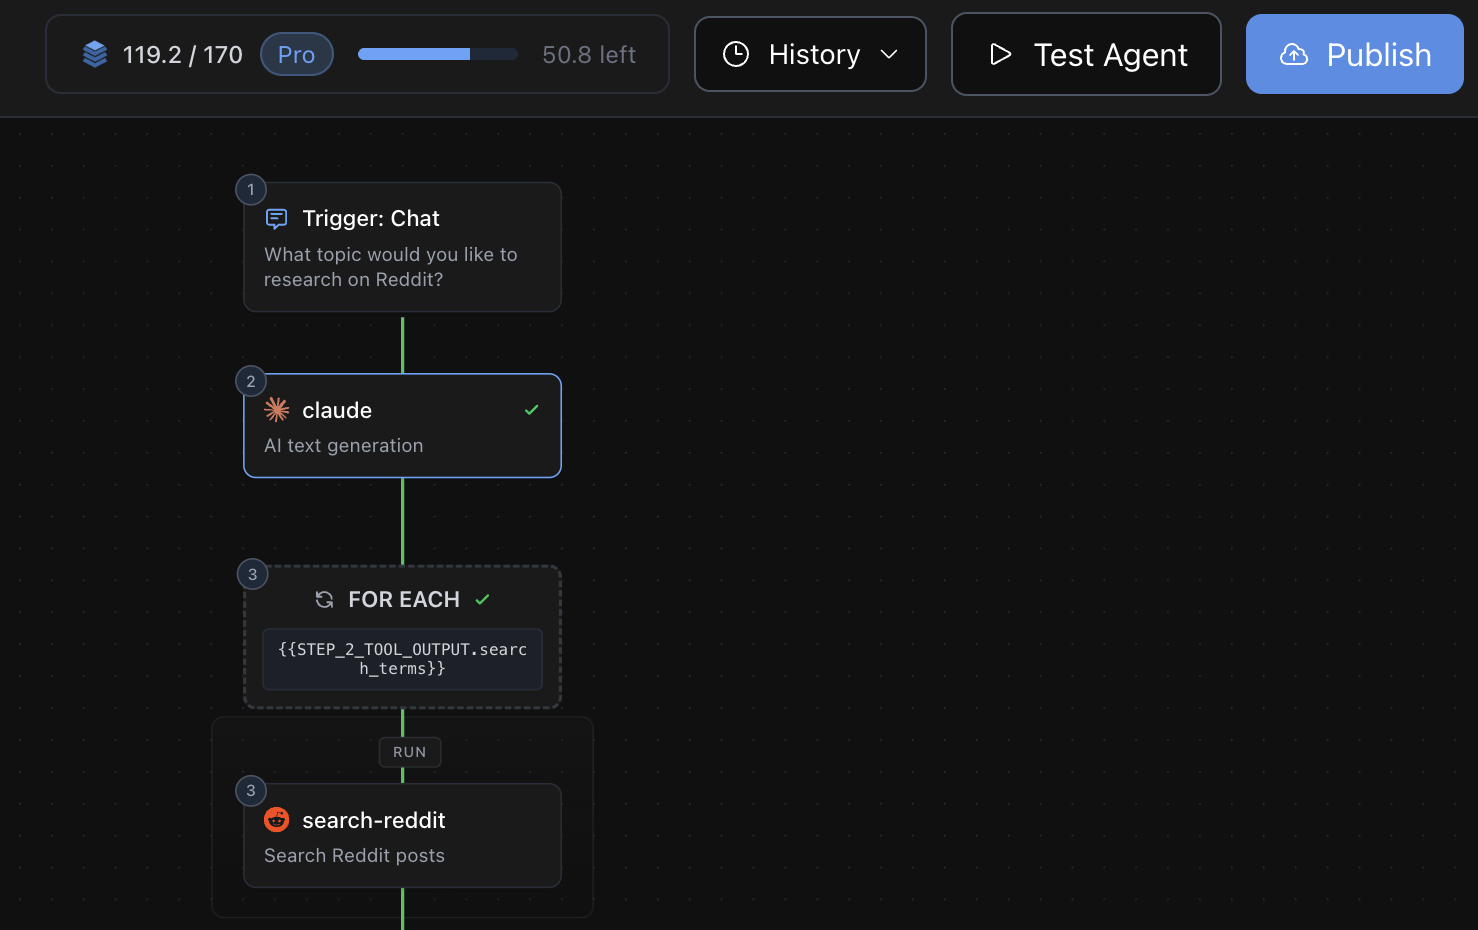
The canvas fills in with your agent's steps, animated one by one. Each node represents one action in the chain.
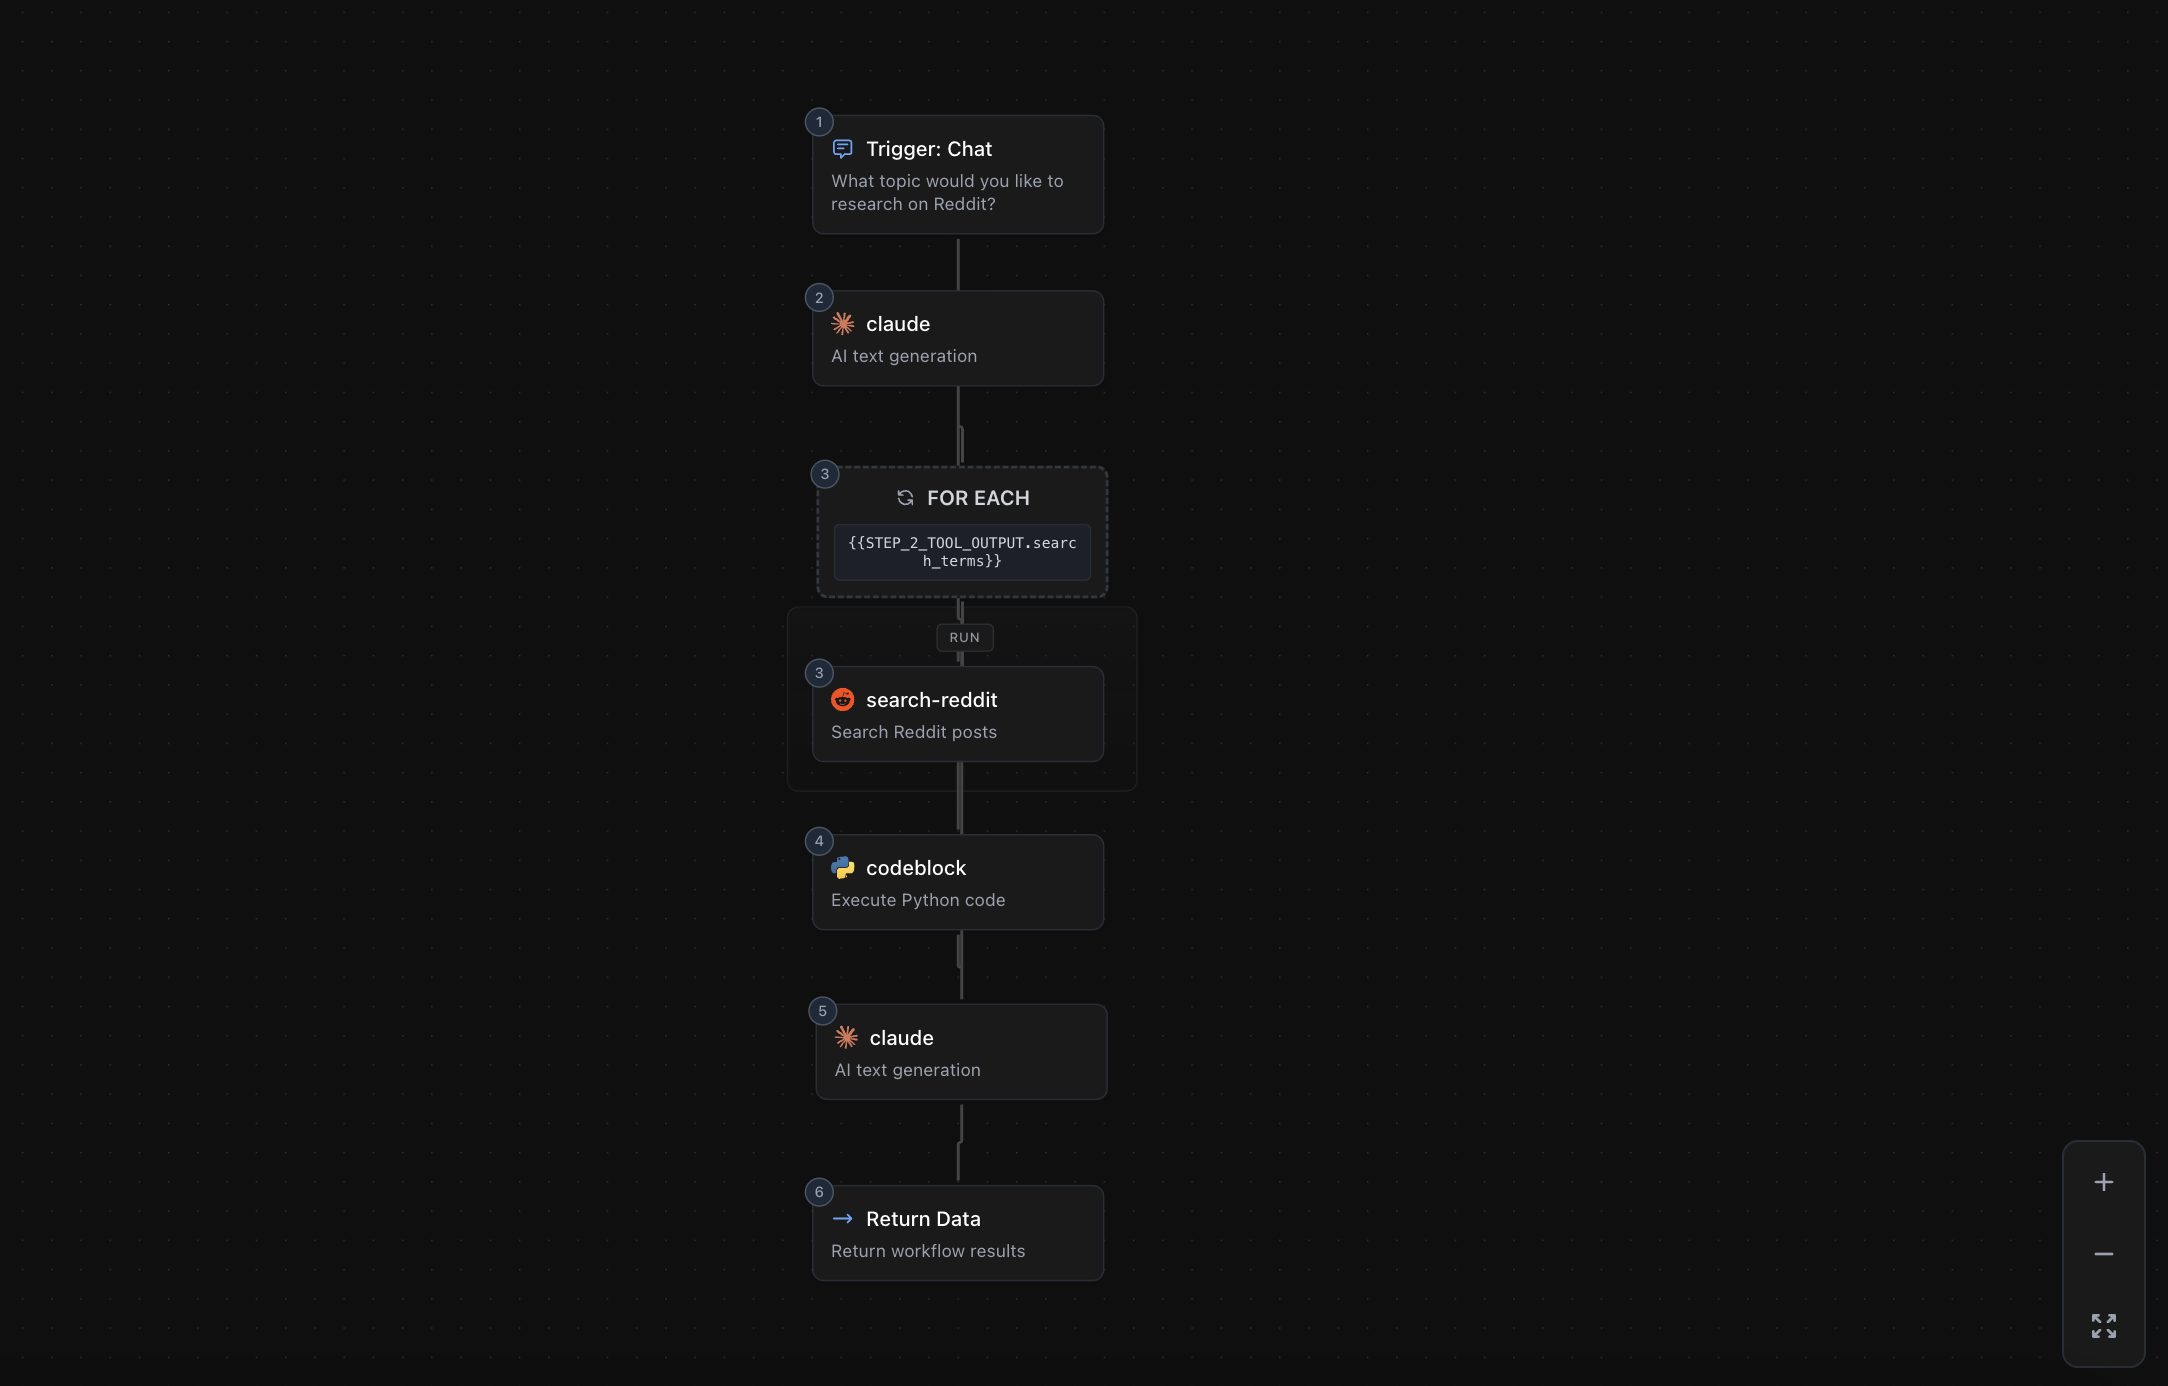
What the nodes mean
- Start (Trigger) — This is the input form your users will see when they run the agent. It defines what fields they fill out — text inputs, numbers, file uploads, checkboxes. The system auto-designs this form based on your description.
- Tool nodes — Each step is a discrete action: a web search, a Claude LLM call, a Composio integration (Gmail, Slack, Google Sheets, etc.), a Python code block, a page scrape, or any of thousands of other tools. Each node's output feeds into the next step.
- Conditional nodes (IF/THEN/ELSE) — When the agent needs to take different paths based on a result (e.g. "if the page changed, do X; otherwise, do Y"), a conditional branch splits the flow into two parallel lanes.
- Loop nodes — When the agent needs to process a list of items — for instance, scraping each of ten URLs in search results — a loop node iterates over the collection and runs the body steps for each item in parallel.
- End node — The final output returned to your user. It packages the last step's result into the response your users see when the agent finishes running.
No manual wiring or configuration is required. The canvas is a visual representation of your agent — you can read it at a glance or continue refining it via the chat panel.
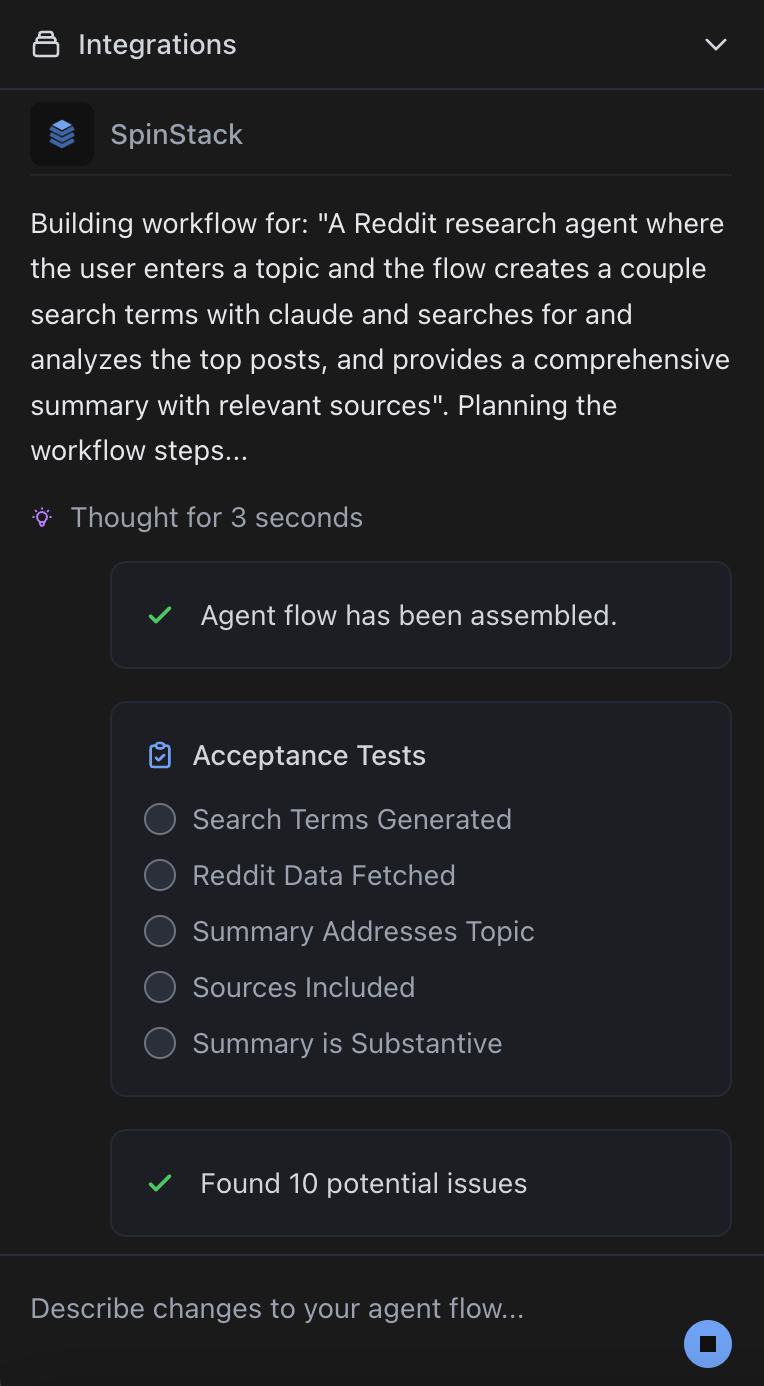
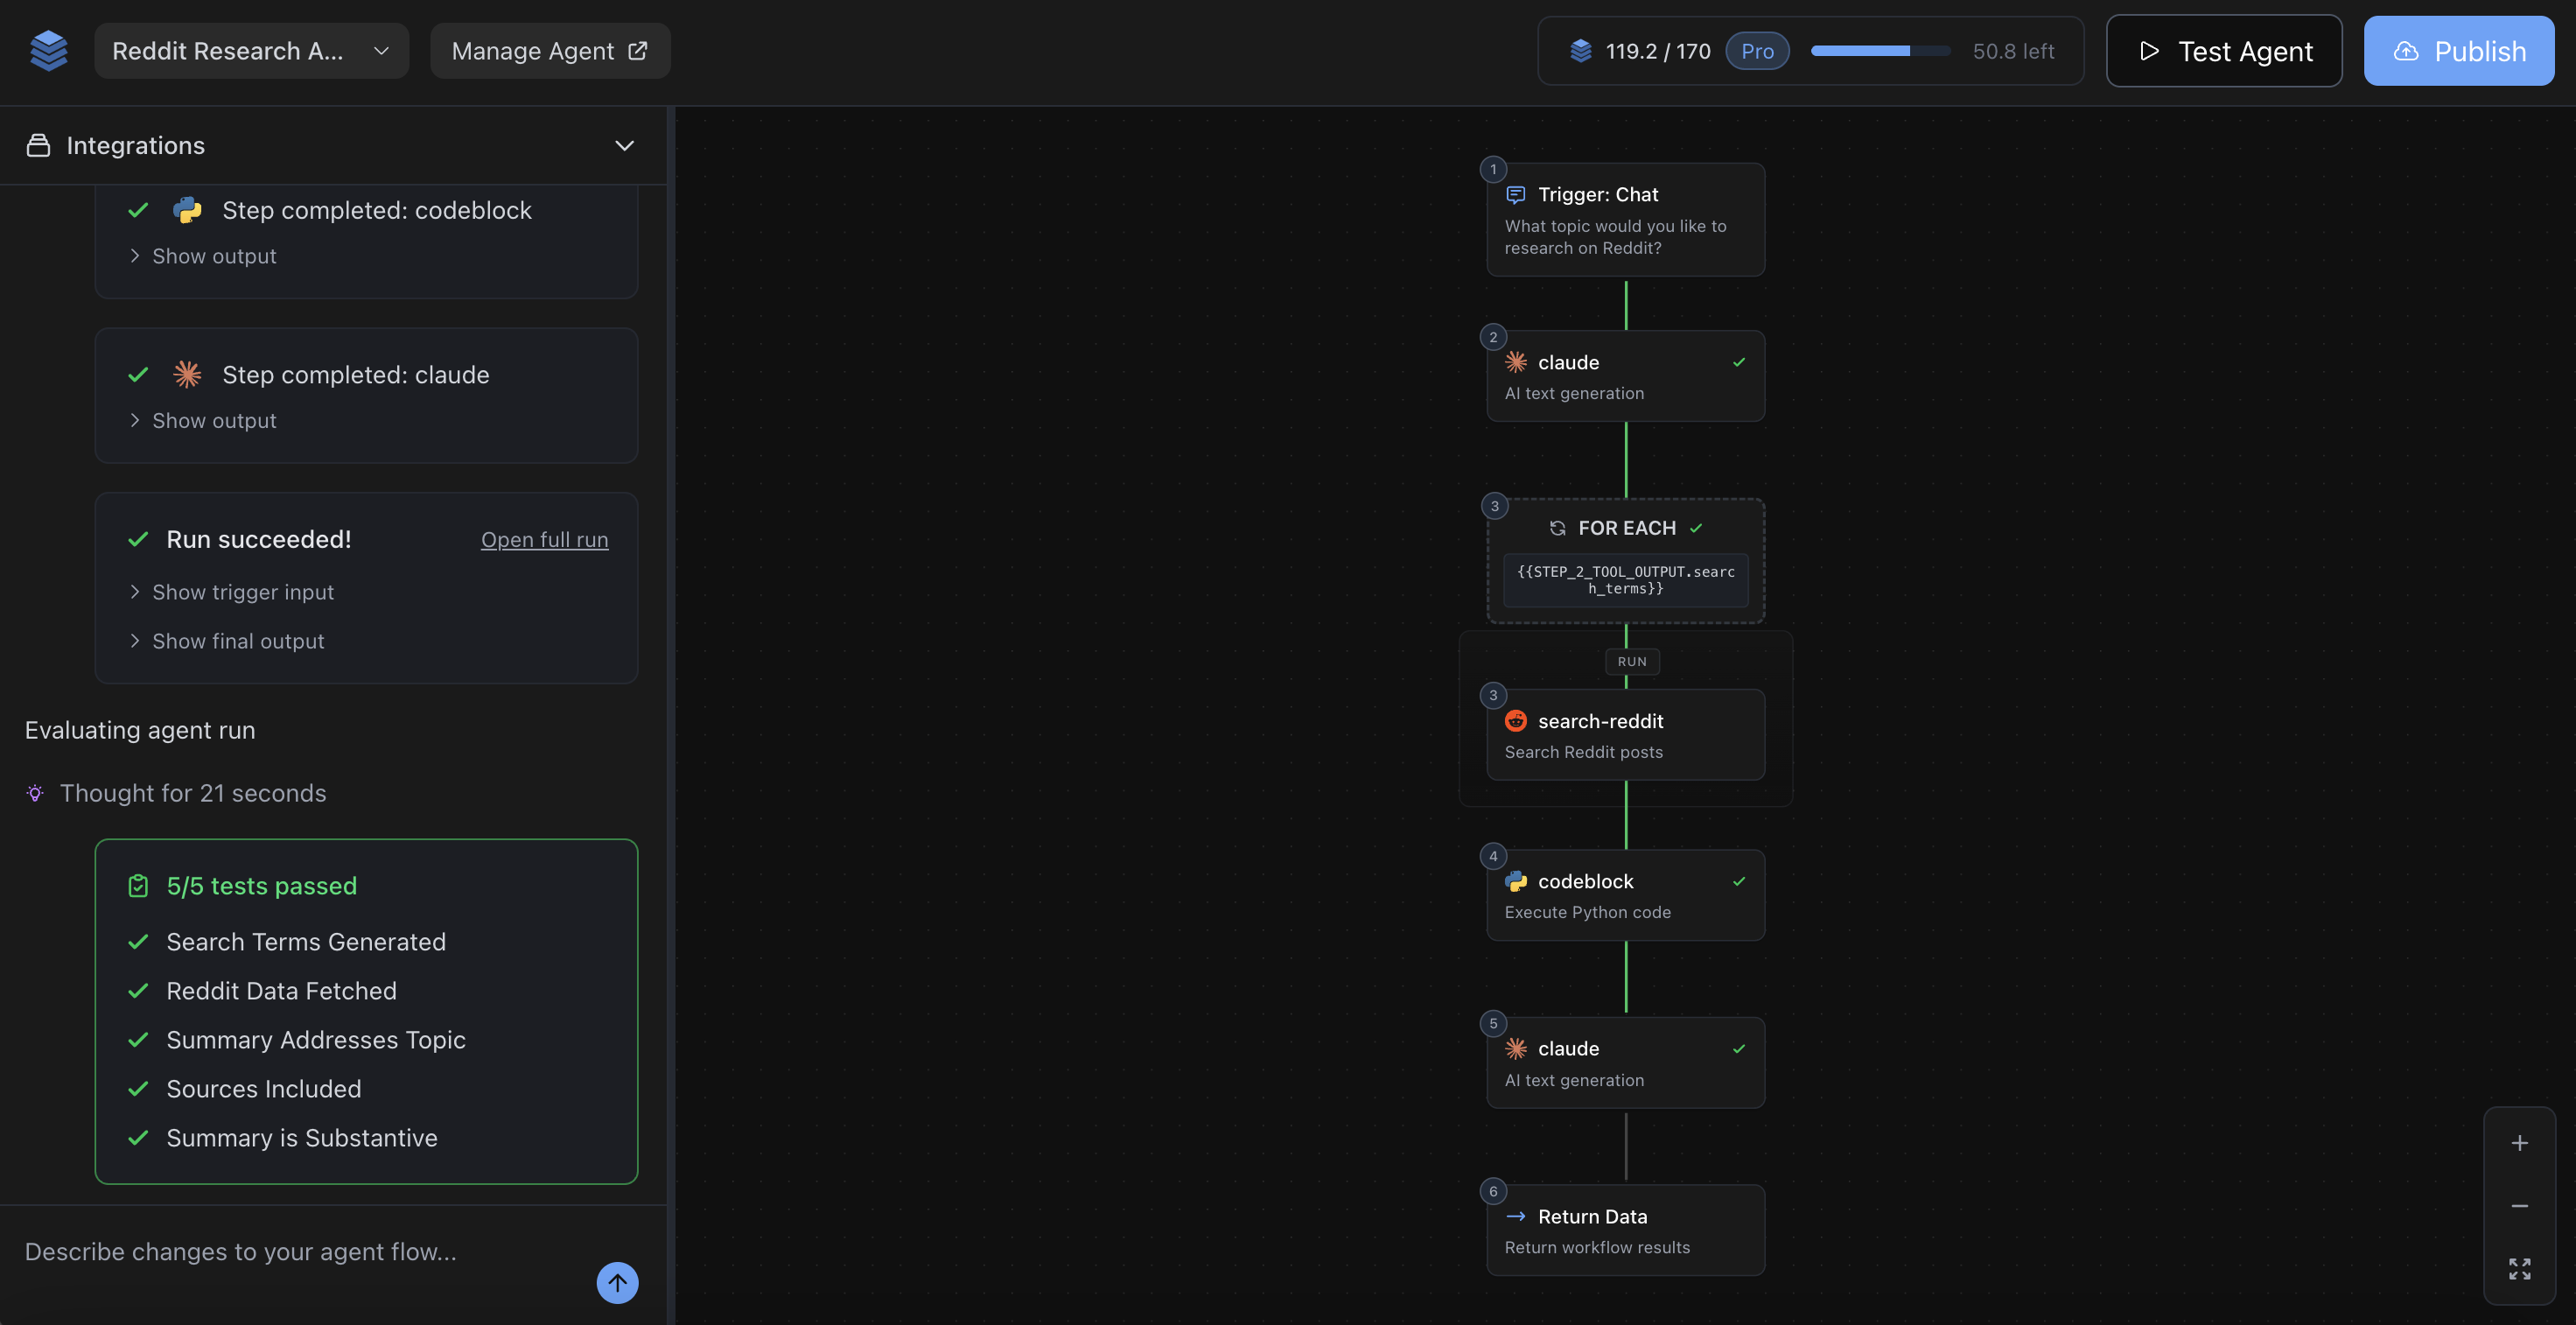
Step 4 — Automatic testing and optimization
As soon as your agent is assembled, the system runs and tests it automatically. You will see live status indicators on each node as it executes — nodes light up as they run and turn green when they complete.
If the agent doesn't produce a correct result on the first run, Spinstack's AI automatically diagnoses the issue, makes targeted edits, and re-runs until the output matches what you described. You don't need to do anything — watch the progress in the chat panel. This process can take a few moments for simple agents or several minutes for more complex ones.
Once the agent is working correctly, it is ready to publish. If you are not satisfied with the result after automatic optimization, you can continue refining it yourself using the chat panel.
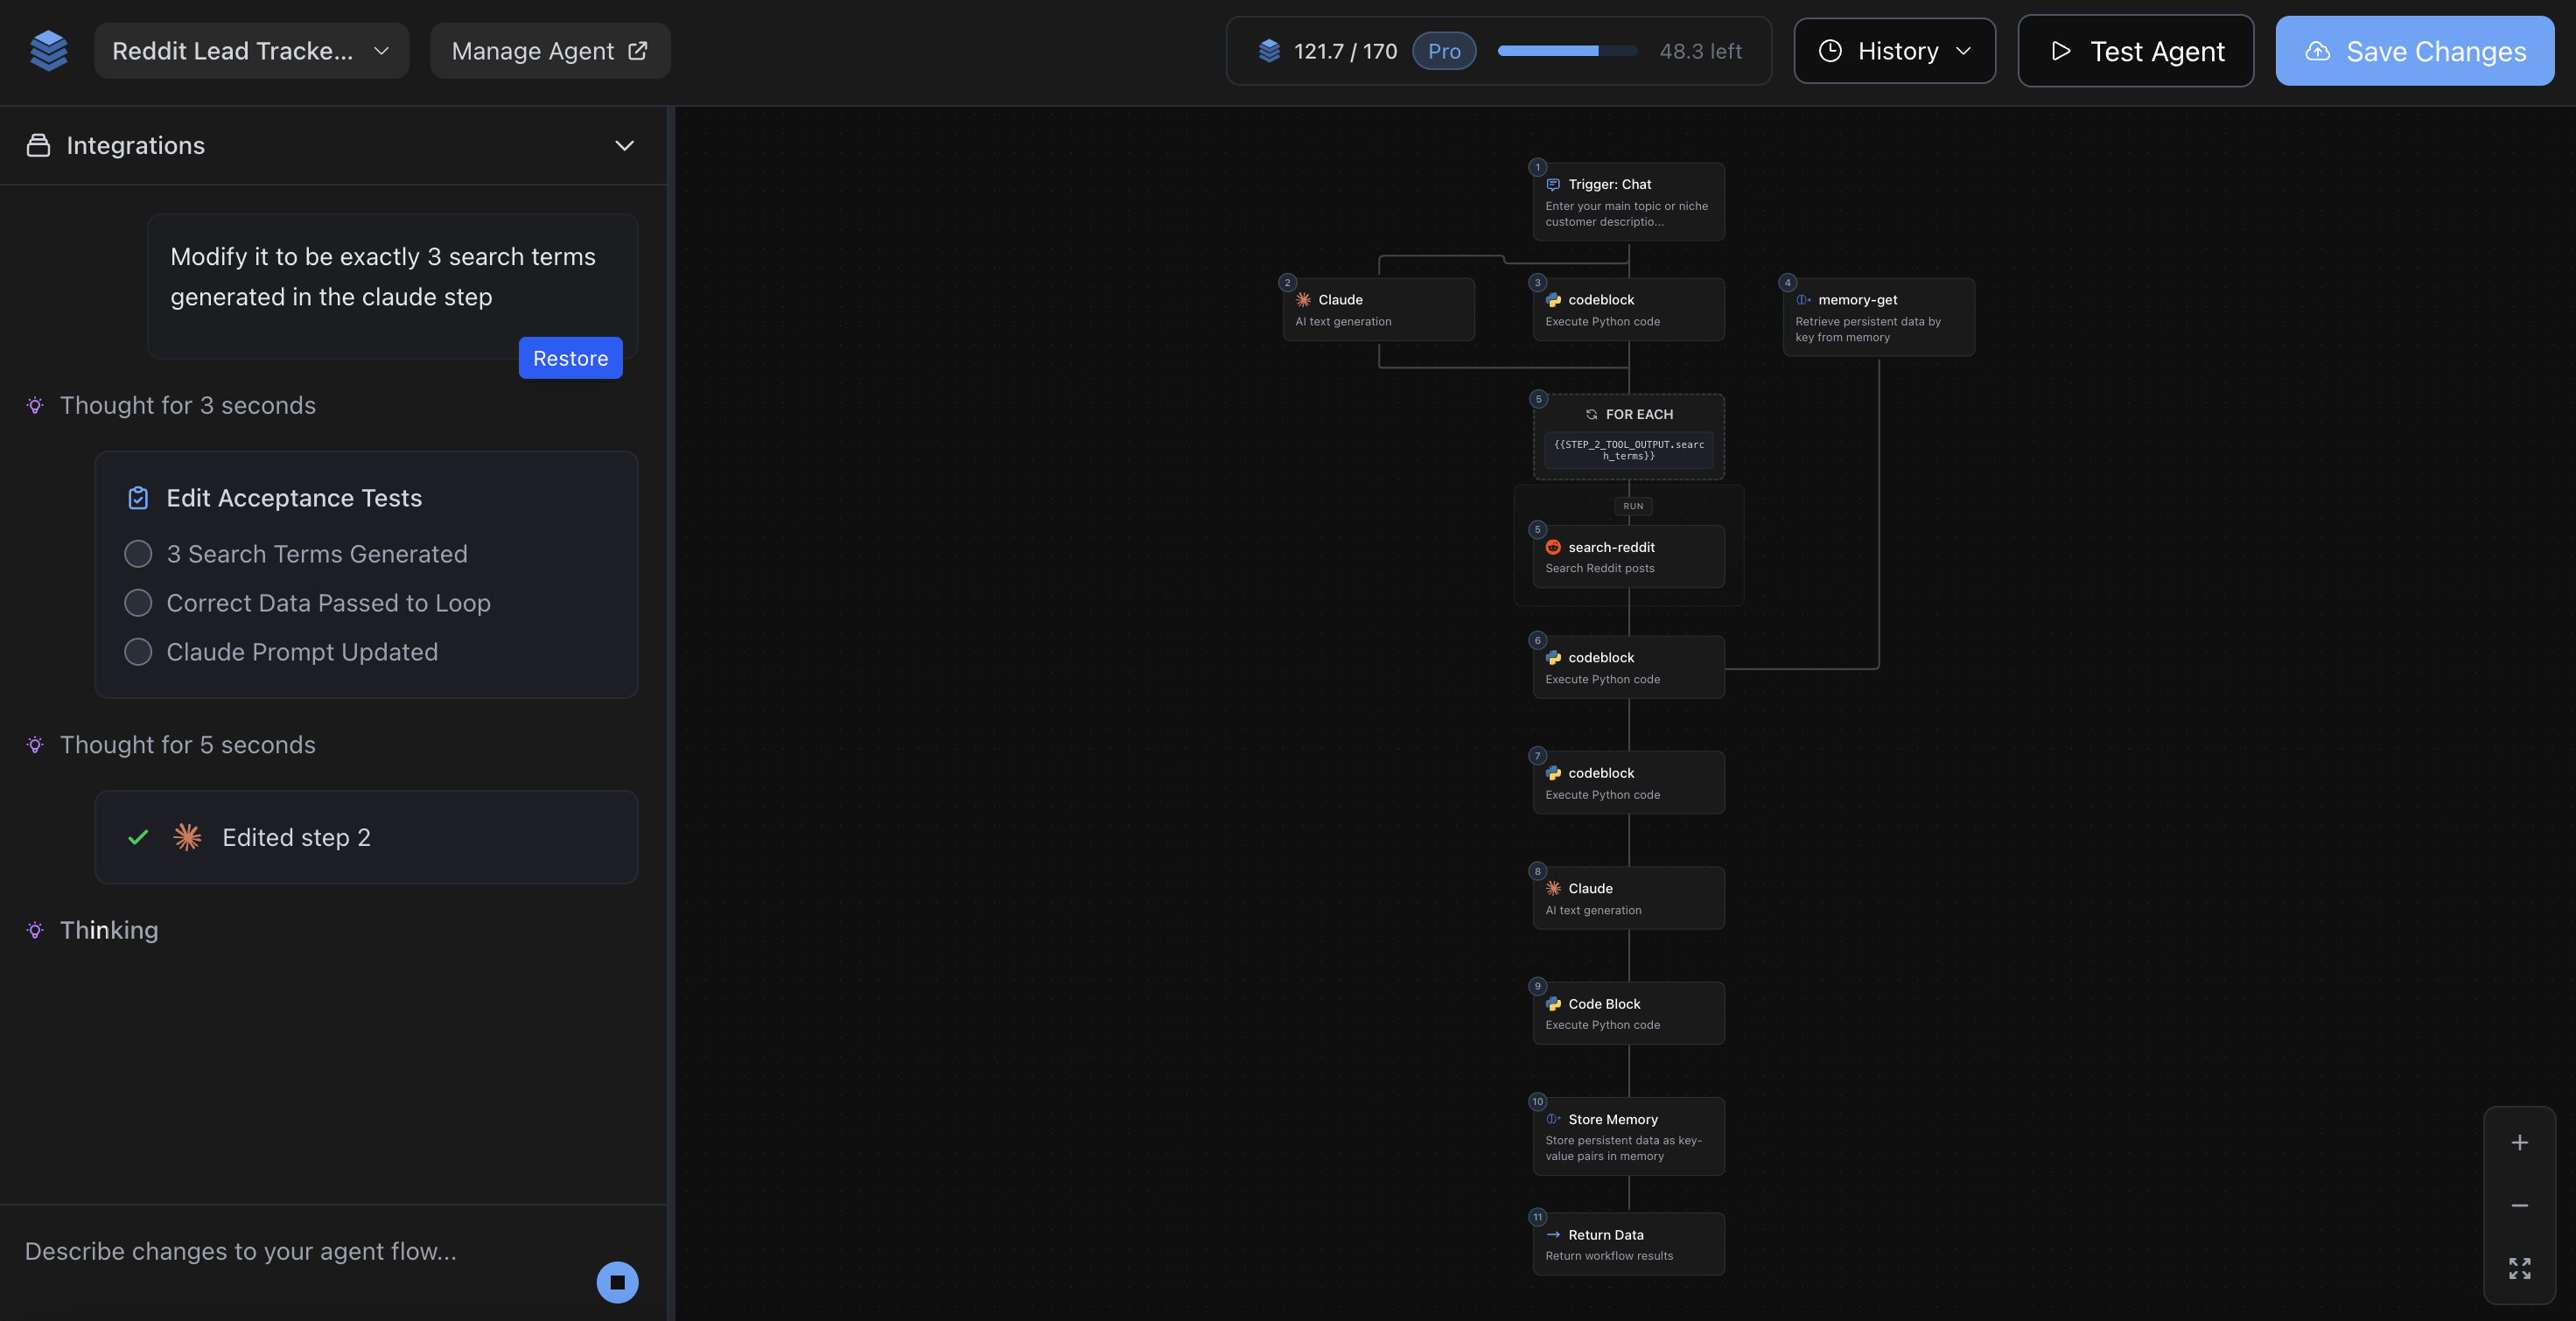
Step 5 — Editing your agent
Once your agent is on the canvas you can refine it at any time using the chat panel on the left side of the screen. Type a plain-English instruction and the agent will apply the change, test it, and confirm it works.
Example edit instructions:
- "Also include the post score and comment count in the summary"
- "Change the output format to a markdown table"
- "Add a step that sends the results to Slack after generating the summary"
- "Make the subreddit field optional with a default of r/all"
You can ask questions too — the agent will answer without making changes if no edit is needed.
If you want to use a service that is not in the built-in tool catalog, the agent can prompt you to add a Custom API. You paste in the API documentation or reference, the system auto-extracts the configuration, you enter credentials once, and the connection is tested server-side. After that, the tool is available just like any built-in.
Step 6 — Publishing your agent
When your agent is working as expected, click Publish. In many cases the agent will publish automatically after successful testing — you will see a confirmation in the chat panel. The publish step deploys everything needed to run your agent in production.
What gets created when you publish
Publishing does significantly more than saving your agent. Here is everything that is created in a single publish:
Your agent is live at https://{your-slug}.spinstackapi.dev. The API accepts POST requests with your trigger fields as the body and returns your agent's output. An OpenAPI spec is generated automatically, so the API is immediately usable from any HTTP client, Zapier, n8n, or custom code.
A production-ready web page that lets users interact with your agent directly in the browser — no API keys or code required. Users fill out the trigger form, click run, and see the output. The page is AI-generated based on your agent's inputs and outputs and is fully AI-editable from the Manage Agent page after publishing.
A full landing page for your agent — generated by AI using your agent's details and pricing configuration. It explains what your agent does, shows pricing tiers, and drives users toward signing up. This page is fully AI-editable from the Manage Agent page.
A portal where your end-users can sign up, log in, manage their subscription, create and delete API keys, and view their usage. This is fully built and integrated with your agent — no additional configuration needed.
A payment page tied to your Stripe account where users can subscribe to your tiers or purchase usage. Spinstack handles payment processing and takes a small platform fee; the rest goes directly to you.
Automatically generated API docs built from your OpenAPI spec, with an interactive playground where developers can test endpoints with their API key directly from the browser.
Step 7 — Managing your live agent
After publishing, head to the Manage Agent page. This is your central hub for everything after launch.
From the Manage Agent page you can:
- View links to all your generated pages (home, app, portal, pricing, docs, playground)
- Test your live agent directly with the built-in mini-playground
- Copy your API base URL and code examples (cURL, Python, JavaScript)
- AI-edit your home page or app page — click the edit button next to either page and describe the changes you want. The AI rewrites the HTML directly.
- Track runs, success rate, latency, and active users
- Return to Agent Studio to continue editing your agent — changes are saved as a draft and deployed when you publish again
Sharing your agent and earning bonus credits
Once your agent is live, sharing it on social media earns you bonus credits. Share posts on X (Twitter), LinkedIn, or other platforms with your agent's link to receive credits added to your monthly balance. This is a good way to offset the credits consumed during creation and testing, especially on a free account.
Common questions
The agent is still not working after automatic optimization. What do I do?
Use the chat panel to give the agent more direction. Describing the specific issue — for example, "the web search step is returning empty results, try a different approach" — helps it zero in on the right fix. You can also click on any node in the canvas to view and manually edit its configuration.
Can I edit my agent after publishing?
Yes. Return to Agent Studio from the Manage Agent page. Any edits you make create a draft — your live agent keeps running on the previous version until you click Publish again. You will see a "Pending Changes" banner when there are unsaved edits, and you can revert at any time to discard them.
My agent uses Gmail / Slack / Google Sheets. How do credentials work?
Integrations are handled through Composio, an industry-standard integration platform. When you add a Composio tool to your agent, you choose between two modes: creator mode (your connected account is used for all runs — good when the tool should act on your behalf for all users) or end-user mode (each of your users connects their own account when they first run the agent — good for things like "send an email from the user's own Gmail"). You connect integrations from the Integrations settings page. No credentials are stored directly on Spinstack for Composio-backed tools.
How many credits does creating an agent use?
Credit usage varies significantly depending on the complexity of your agent and how much optimization is needed to get it working. Simpler agents that require less iteration use fewer credits; complex multi-step agents that need more testing and refinement use more. You can monitor your credit balance in the top bar of Agent Studio. If you are regularly building complex agents, the Pro plan's higher monthly allowance and overage billing (rather than a hard cap) gives you more room to work.
Ready to build?
Head to Agent Studio and describe your first agent. The whole process from idea to live API is largely automatic — describe what you want, configure the basics, and let Spinstack do the building.
Open Agent Studio